


Another year has rolled around and there are new exciting Raspberry Pi products coming out on the market. Most of them are about what you’d expect – refinements and new form factors of the already established Raspberry Pi series of SBCs. We’ve already reviewed one of their newer models – the Raspberry Pi 4B computer in one of our previous issues. But now, the company seems to be dipping its toes into a new product segment that’s long since been dominated by Arduino and TI. MCU development boards have traditionally existed alongside single-board computers with little competition between the two fields. With the Raspberry Pi Pico, a microcontroller development kit from Raspberry Pi, we might be seeing the start of a new chapter for this market.
With that being said, let’s move on to the review. The Raspberry Pi Foundation has once again kindly provided us with review units of the product in question. The package we received was an envelope with a few of these tiny boards packed in carrier tape. This was surprising, but extremely clever. The packaging costs must have been shrunk to the absolute bare minimum (which we wholeheartedly welcome) to allow for the board’s minuscule $4 price tag. This makes it one of the cheapest development systems available today, but it still managed to punch far above its price class – we’ve seen features here that are absent on systems orders of magnitude more expensive. (On second though, is that not exactly what Raspberry Pi did with their original SBC models?)
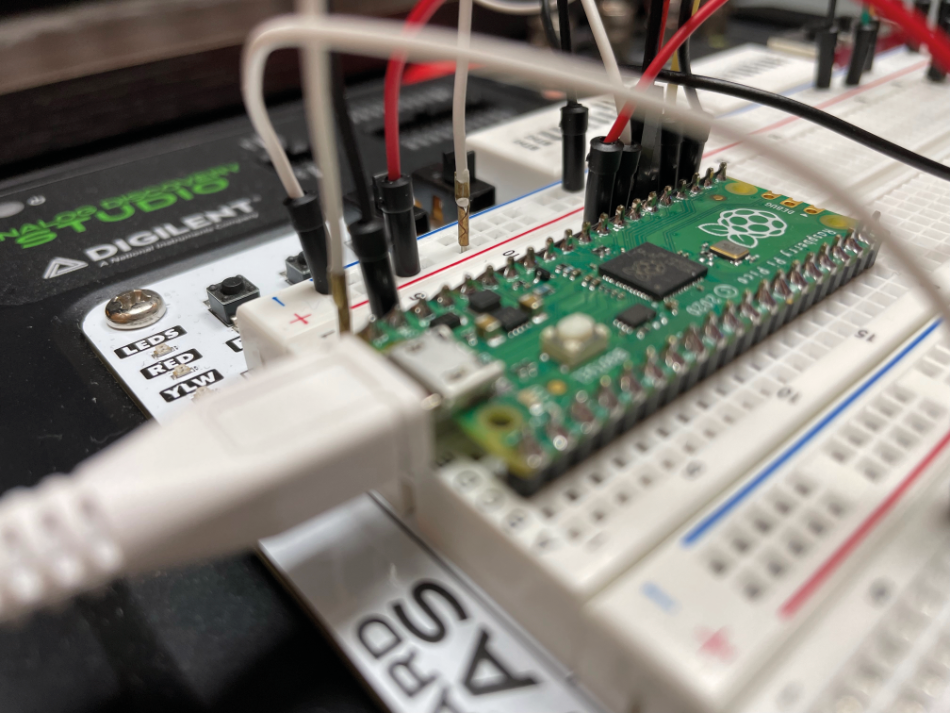
After the unboxing (erm… unpacking?) experience, we were greeted with, or should we say, a lack of header pins. This, though, had been quickly overcome with a soldering iron and a tad of patience, and not even a full ten minutes later we had a set-up Pico ready to use on a breadboard! As a side note here, the soldering process was really a breeze, and the copper pads on the PCB were very high quality, so we feel like even beginners could add pin-headers on their board.
The rest of the setup process was a breeze – with the Thonny IDE handling all of the configuration for us. It was a very straightforward, plug-and-play experience. The programs are written in MicroPython, a simplified flavour of the Python programming language, with optional APIs available for C and C++. This enables versatility in the workflow with this board, more so than with something like an Arduino UNO.
Powering this little board is Raspberry Pi’s first in-house SoC, the RP2040. It comprises of two ARM Cortex M0+ cores, running at a maximum of 133 MHz, along with 264 kB of SRAM and 2 MB of flash storage for all your code. The SoC also includes eight state machines bundled into a cluster called the PIO – short for programmable I/O (more on this later). There’s also a fourchannel 12-bit ADC (though only three of the channels seem to be accessible) on the board. These chips seem to be produced by TSMC on their 40nm process as of the time of writing.
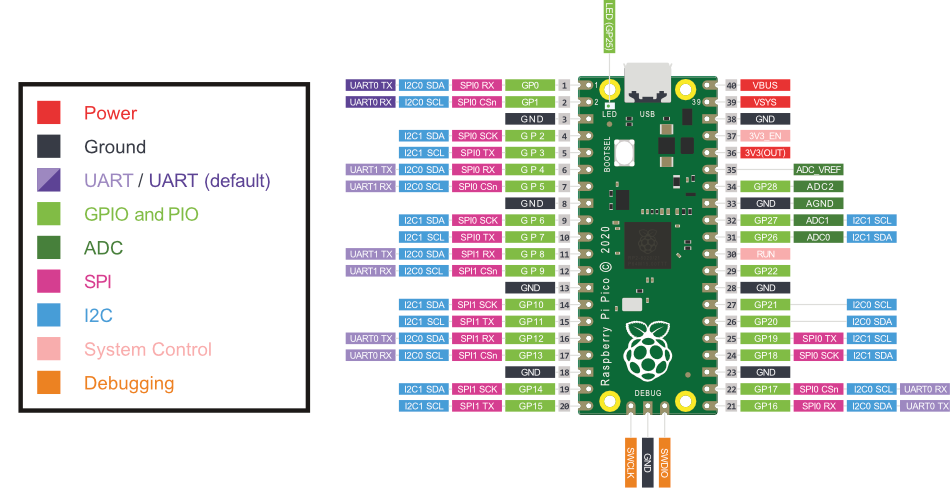
Raspberry Pi Pico Pinout
This all now adds up to a pretty impressive package, especially given the board’s cost. We’ve tinkered around with the board and wrote some programs, testing the functionality in MicroPython, and we’ve consistently been surprised by just how much we’re able to do with it.
Firstly, the API that the board uses is very elegant. It’s, dare we say, ever-so-slightly lower-level than the one Arduino uses, and there is a lot of missing libraries still, but unlike the aforementioned Arduino-flavoured C, Pico’s MicroPython allows for much finer control of the actual board while not escaping the syntax candy provided by Python. The timings seem very precise, even when “bit-banging” communications (more on this later, as well). Raspberry Pi managed to bring the more complicated aspects of MCU programming down to a level that’s easily graspable but not overwhelming, with the same functions offering both simple and easy-tounderstand functionality as well as fine-tuned performance, for those who need it.
Secondly, the board is scary fast. Instantaneously fast. The MicroPython bootloader seems to boot up immediately, as soon as the board receives its 5V of power through the USB connector. Mentioning voltages, the board uses a 3.3V IO, similar to most ARM-based MCUs available, which isn’t too much of a bother for most projects.
Compared to the $5 Raspberry Pi Nano, one could say that the Pico just cannot be worth it, but it’s simply a whole another product. The Nano is a full-blown linux computer, with all the things that come attached with that, like proper shut-down sequences and boot-up times (and the lack of an ADC). The Pico is a microcontroller board, meaning that the chip on it works much closer to the other hardware, and runs nothing but your code (and maybe a bootloader). This also means there’s no need for proper shut-downs or lengthy boot-ups (and there’s also an ADC, hooray).
It’s also power efficient. Very power efficient. Even with an LCD matrix display attached to it, the board took just over 120 mA, which works out to about 600 mW of power. Compare that to the 5W the Raspberry Pi 4 takes while running idle (throwback to the to the chip thermal throttling – something we certainly won’t be dealing with in here) and you can see why the Pico is a superior board for embedded projects.
Now, onto the part that we promised more on (twice). The PIO is yet another important module in the unit. It’s a set of eight state machines – tiny little cores that are capable of only 9 commands, such as SET, JMP, PULL and PUSH. These little units might not seem like much but they are capable of taking over the bit-banging from the main Cortex cores. Let us explain this a little more. Some devices communicate using standard protocols, like I2C or SPI. The RP2040 offers various stock interfaces, but many times it’s necessary to use a custom protocol that ony a handful of devices use. While the “big” M0+ cores are plenty capable and fast, they are still single-threaded, so manually controlling GPIO just to communicate using a custom standard, or even just blink a light is something that leaves no room for other tasks. Of course, the dual-core SoC somewhat mitigates this issue by providing a second thread (there’s no RTOS here, so two threads, one-per-core it is), but that’s still only two separate communications. On the other hand, using interrupts for timing-critical tasks can result in a loss of accuracy, as an interrupt can fire mid-instruction cycle, causing the enclosed code to be executed with a delay.
Raspberry Pi Pico
The solution that the Pico offers here is ingenious and unique to this board. The aforementioned PIO is capable of devoting all of its computing power to just flip GPIO pins into a configuration provided via the first-in-first-out pipeline from the application processor. Each state machine can control more than one pin (though these have to be sequential). The state machines are also very precise, with their frequency being set in code to an exact number, and every cycle performing only one instruction. Programming these in Python is done using a wrapper for the native PIO Assembly language they use. This effectively makes the PIO an eight-core cluster of tiny, powerefficient and precise chips capable of flipping GPIO pins while taking the workload off of the main processor. The PIO has already been utilised by makers to add even complex ports, such as digital video outputs, to their Raspberry Pi Picos.
We’ve managed to write a little LCD driver library and we also utilised a PIO core to control a status LED independently. The learning curve wasn’t too steep and the API offers plenty of convenience. We’ve actually enjoyed the time spent making this little demo quite a lot, and we feel like it offers an insight into what this board is capable of. A more detailed demonstration of the code and the electronics will be published in a separate article in the coming weeks.
The only downside we’ve found so far is the small community surrounding it. There’s just not that much software available at the moment and many things require a certain amount of handiwork to get up and running. Most sensors just don’t have stock drivers on the platform. This isn’t something that Raspberry Pi is responsible for directly, as every new architecture is bound to have its early phases, but it’s still something to keep in mind.
Overall, we’ve given the Raspberry Pi Pico a thorough test. It’s one of the most compelling new development systems we’ve used. Its feature set is extremely rich, even next to its minuscule size, and the combination of a dual-core processor with the unique PIO system gives rise to incredible functionality. The board is tiny and compact, with a low power draw, and on top of that, it has an impossibly low price. The only real drawback is the aforementioned lack of software support at this time, which is relatively simple to overcome. On top of that, the community grows every day, so we have no doubts that in a few years, Raspberry Pi’s MCU systems will have just as much support as the current leading brands. There’s amazing potential in this board, and it’s suitable for a lot of different use cases. We certainly hope that there will be follow-ups to this model and that Raspberry Pi-silicon based systems enter the mainstream.
import utime
import rp2
from machine import Pin

@rp2.asm_pio(set_init=rp2.PIO.OUT_LOW)

def blink():
    set(pins, 1) [19]
    nop()        [19]
    nop()        [19]
    nop()        [19]
    nop()        [19]
    set(pins, 0) [19]
    nop()        [19]
    nop()        [19]
    nop()        [19]
    nop()        [19]

@rp2.asm_pio(set_init=rp2.PIO.OUT_LOW)

def stat_off():
    set(pins, 1) [1]
    wrap_target()
    nop()
    wrap()

# Init state machine with "blink" program
# (state machine 0, running at 2kHz, base pin is GP25 (LED))
sm = rp2.StateMachine(0, blink, freq=2000, set_base=machine.Pin(25))
bm = rp2.StateMachine(1, stat_off, freq=2000, set_base=machine.Pin(25))

rs = machine.Pin(16,machine.Pin.OUT)
e = machine.Pin(17,machine.Pin.OUT)
d4 = machine.Pin(18,machine.Pin.OUT)
d5 = machine.Pin(19,machine.Pin.OUT)
d6 = machine.Pin(20,machine.Pin.OUT)
d7 = machine.Pin(21,machine.Pin.OUT)

def pulseE():
    e.value(1)
    delayShort()
    e.value(0)
    delayShort()

def delayShort():
    utime.sleep_us(40)

def delay():
    utime.sleep_ms(2)

def delayBig():
    utime.sleep(0.3)

def send2LCD4(BinNum):
    d4.value((BinNum & 0b00000001) >>0)
    d5.value((BinNum & 0b00000010) >>1)
    d6.value((BinNum & 0b00000100) >>2)
    d7.value((BinNum & 0b00001000) >>3)
    pulseE()

def send2LCD8(BinNum):
    d4.value((BinNum & 0b00010000) >>4)
    d5.value((BinNum & 0b00100000) >>5)
    d6.value((BinNum & 0b01000000) >>6)
    d7.value((BinNum & 0b10000000) >>7)
    pulseE()
    d4.value((BinNum & 0b00000001) >>0)
    d5.value((BinNum & 0b00000010) >>1)
    d6.value((BinNum & 0b00000100) >>2)
    d7.value((BinNum & 0b00001000) >>3)
    pulseE()

def whichLinePos(line, pos):
    b = 0
    if (line == 1):
        b = 0
    if (line == 2):
        b = 40
    cursorHome()
    for x in range(0,b+pos):
        moveCursorR()

def clearDisplay():
#blanks the LCD, needs a long delay.
    rs.value(0)
    send2LCD8(0b00000001)
    rs.value(1)
    delay()
def cursorHome():
#returns the cursor to home, needs a long delay.
    rs.value(0)
    send2LCD8(0b00000010)
    rs.value(1)
    delay()
def cursorMoveForward():
    rs.value(0)
    send2LCD8(0b00000110)
    rs.value(1)
def cursorMoveBack():
    rs.value(0)
    send2LCD8(0b00000100)
    rs.value(1)
def moveCursorR():#write text from left to right
    rs.value(0)
    send2LCD8(0b00010100)
    rs.value(1)
def moveCursorL():#write text from right to left (backwards)
    rs.value(0)
    send2LCD8(0b00010000)
    rs.value(1)
def cursorOff():
    rs.value(0)
    send2LCD8(0b00001100)
    rs.value(1)
def cursorOn():
    rs.value(0)
    send2LCD8(0b00001110)
    rs.value(1)
def blinkOn():
    rs.value(0)
    send2LCD8(0b00001111)
    rs.value(1)
def blinkOff():
    rs.value(0)
    send2LCD8(0b00001100)
    rs.value(1)
def displayShiftR():#move all caractors one space right
    rs.value(0)
    send2LCD8(0b00011100)
    rs.value(1)
def displayShiftL():#move all caractors one space left
    rs.value(0)
    send2LCD8(0b00011000)
    rs.value(1)
def displayOff():
    rs.value(0)
    send2LCD8(0b00001000)
    rs.value(1)
def displayOn():
    rs.value(0)
    send2LCD8(0b00001100)
    rs.value(1)

def setUpLCD():
    rs.value(0)
    send2LCD4(0b0011)
    send2LCD4(0b0011)
    send2LCD4(0b0011)
    send2LCD4(0b0010)
    send2LCD8(0b00101000)
    send2LCD8(0b00001100)
    send2LCD8(0b00000110)
    send2LCD8(0b00000001)
    rs.value(1)

setUpLCD()
while True:
    sm.active(1)
    whichLinePos(1,0)
    for x in 'magazin':
        send2LCD8(ord(x))
        delayBig()

    moveCursorL()

    cursorMoveBack()

    whichLinePos(2,15)
    for x in 'akinortahem':
        send2LCD8(ord(x))
        delayBig()
    sm.active(0)
    bm.active(1)
    utime.sleep(0.1)
    bm.active(0)
    utime.sleep(2)

    clearDisplay()</code></pre>
He’s also the key person behind English translations, especially of education and maker oriented texts.
- Youyeetoo X1 review - 04/09/2024
- Orange Pi 5 Plus review - 01/25/2024
- LattePanda Sigma Review: A new flagship - 12/12/2023