


We’ve had our hands on the great CircuitMess Chatter in the previous issue. It’s a lovely DIY-assembled development platform with surprising versatility and a great beginner-friendly IDE called CircuitBlocks (based on MakeCode and PXT-Blockly). Even after finishing the core building part of the experience, there’s more to discover within these – and we were especially surprised to find full support for the ESP32duino packages which enable even Wi-Fi projects.
Today, CircuitMess sent us another of their great kits – the Jay-D STEM box. It’s the second box in the series – but it’s still available to order and is one of their most beloved kits.

Opening the box, we’re greeted with a familiar array of PCBs, acrylic parts and electronic components. There are also two speakers included – which makes sense given the nature of this DIY kit. Which we haven’t mentioned yet – right.
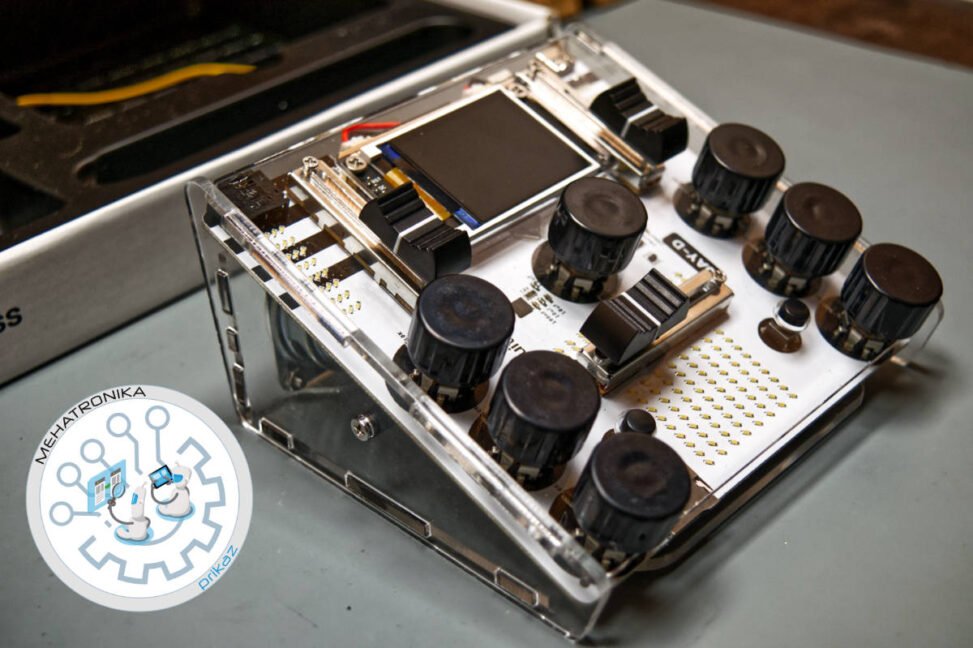
It’s a little mixing desk! Complete with crossfaders, digital effects, and all the basic features you’d expect. We find the concept here extremely appealing and satisfying – and who wouldn’t want to assemble a piece of music tech! So, without further ado – let’s get to it.

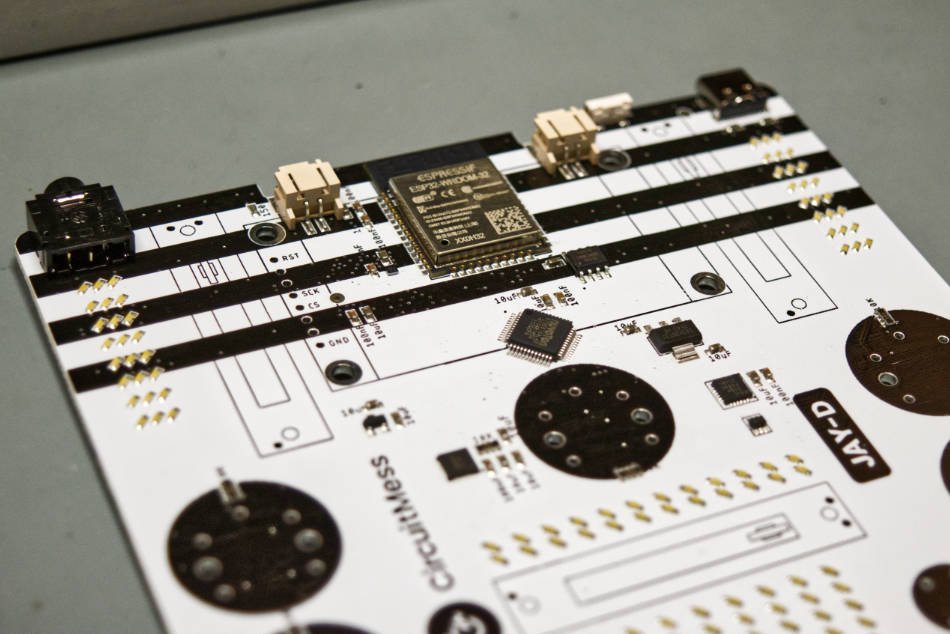
Once again, the most finicky SMT components have thankfully been pre-soldered to the board. Sadly, we can’t see a middle schooler using a hot air rework station, no matter how fun and rewarding as tricky soldering manoeuvres are. That being said, any old soldering iron will work just fine for the work required here. We’d recommend having a solder pump or a braided copper solder wick on hand, as well, just in case whoopsies happen. Some electrical tape also helps in cases where the component just refuses to stay in place. The holes on these PCBs are well placed, so this shouldn’t be an issue, though.
The actual build process starts with a headphone jack – which was a simple and nice step. After that came soldering the pushbuttons, sliders and rotary encoders – which was a very simple step, as well. There is a decent amount of soldering overall – though a bit less than with the chatters. We certainly believe it would be a lot more challenging for someone picking up the iron for the first (or second) time – but with no joints being too tricky so far (that antenna from the Chatter…), it’s a very friendly challenge.
The “tough” challenge in this build is the screen. Unlike the ZIF-connected screen of the Chatter, CircuitMess instead opted for a pin-header. Headers like this aren’t difficult to solder, but they take some practice to get just right (and perfectly perpendicular to the surface). Certainly a tiny hurdle to overcome for a beginner, but nothing impossible (soldering just one or two pins and then straightening the connector while keeping the solder molten in place usually does the trick).

After this step and a few screws, our screen was ready to be mounted. After aligning it just right, a final eight solder joints had to be made (these were very easy this time around since the entire construction held them tightly in place) and we were done!
Once we peeled off the acrylic protective films (legitimately satisfying), we started assembling the case. It folds in on itself like origami and requires some fidgeting to get just right, but in the end, it feels very sturdy and well-supported. Surprisingly, two of the little rubber feet go on the inside of the case and not on the bottom. We instinctively messed this step up, so we (shamefully) had to open the case again, unstick the feet and put them in their place.

We had a blast testing out the functionality of the Jay-D. It’s a satisfying little mixing table with proper crossfading and effects on both tracks and in general sounds pretty good! It’s pretty awesome seeing something like this running on an ESP32 chipset. If we had to nitpick, we’d probably like a few UI optimisations here and there – but for what it’s worth – CircuitMess delivered a great and rewarding experience with the entire product – filling it to the brim with both educational potential and giving it a proper use case once it’s been built. There is one somewhat major flaw that we can point out though – no audio inputs of any sort! While Jay-D is a DJ-style mixer (and these can sometimes come without these), we think the utility of having them onboard would expand the use cases and potential of the device so, so much (imagine the awesome stuff you could do developing custom live effects or such – the ESP32 has more than enough power for this sort of usage).

Once you’re done being a musician, it’s time to code a little! Like every CirucitMess device, the Jay-D connects to PCs and can be programmed either with graphical elements or proper Arduino-like code. There’s a lot to be done here – and the excellent APIs that are provided allow for high-level access to the key hardware features of the Jay-D, including the hallmark LED arrays. There’s a lot to be tinkered with here, and as with the Chatter – there’s a lot more power under the hood. We recommend reading our Chatter programming review to get a better idea of what sort of power lies within these systems – as the same applies here.
Overall, this kit is a very appealing package. Somewhat simpler in assembly than the Chatter, it’s an even more well-balanced starter kit with a mild learning curve but a lot of things to offer and teach – from soldering to coding, working with acrylic parts, handling sensitive components and lastly – mixing and jamming to some music.
More informations: CircuitMess https://circuitmess.com/products/jay-d-diy-dj-mixer-kit
He’s also the key person behind English translations, especially of education and maker oriented texts.
- Clockwork Pi DevTerm review - 04/24/2024
- Youyeetoo X1 review - 04/09/2024
- Orange Pi 5 Plus review - 01/25/2024